#2 Using a LED as HeartBeat in Petalinux
In this note we are going to configure a LED connected to the PS MIO as a heartbeat in the Ultra96 board.
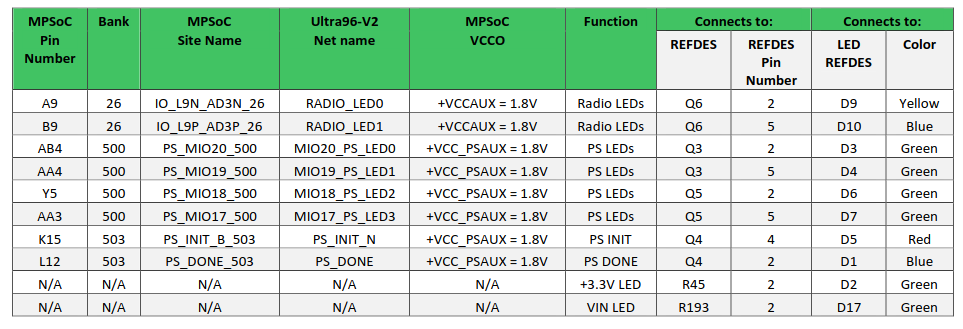
If we take a look to the hardware guide of the Ultra96 v2 board, we can see that it has several leds, four of them connected to the PS MIO ports.

In this example we are going to use the LED connected to the MIO 20.
Once we are in the Petalinux configuration, we need to navigate to os/project-spec/meta-user/recipes-bsp/device-tree/files/, and open the file device-tree.dtsi. This file contains the device-tree entries of the user. Here we can add the drivers and the behavior of all the hardware connected to the Zynq MPSOC device.
To configure the LEDs of the board, we need to add a node compatible with the gpio-leds device. Here we can find a template for this kind of node. Then, in the gpios we need to configure the GPIO address, given by the pointer &gpio, and the number of GPIO we are going to use, in this case, 20. The third field of this configuration sets the default state of the GPIO, in this case, ‘0’. Finally, we need to add the default-trigger field. The Linux kernel allows us to define different triggers. To create a heartbeat led, we are going to configure the default-trigger as "heartbeat". The resulting node will be as follows.
gpio-leds {
	compatible = "gpio-leds";
	led-hb {
		label = "led-hb";
		gpios = <&gpio 20 0>;
		default-state = "on";
		linux,default-trigger = "heartbeat";
		};
};
Remember that, for other boards, you will need to change the number of the MIO GPIO.


